# Azure Sentinel Integration
### Overview
Microsoft Sentinel is a cloud-native SIEM and SOAR solution built on Azure. It provides intelligent security analytics and threat intelligence across the enterprise, with a single solution for alert detection, threat visibility, proactive hunting, and threat response.
This guide walks you through integrating Microsoft Sentinel with the alert management platform. Since Sentinel does not natively support outbound HTTP webhooks, the integration is implemented using Azure Logic Apps (Playbooks) as middleware. When a Sentinel incident is created, an Automation Rule triggers a Logic App playbook that formats and forwards the incident payload via HTTP POST to the platform webhook.
***
### Integration Flow
1. A security event or custom Analytics rule triggers a new Incident in Microsoft Sentinel.
2. The Sentinel Automation Rule detects the incident creation and runs the configured Logic App playbook.
3. The Logic App sends an HTTP POST request to the platform webhook with the structured incident payload.
4. The platform receives the payload, validates the schema, and creates an alert with the appropriate severity.
***
### Webhook Payload Schema
The payload is sent by the Logic App as a custom-structured JSON object built from the Sentinel incident trigger output.
| **Field** | **Type** | **Required** | **Description** |
| ---------------- | -------- | ------------ | ------------------------------------------------------ |
| IncidentName | string | Yes | Display name of the Sentinel incident |
| IncidentNumber | integer | Yes | Auto-incremented incident identifier in the workspace |
| Severity | string | Yes | Incident severity: High, Medium, Low, or Informational |
| Status | string | Yes | Current lifecycle status: New, Active, or Closed |
| Description | string | No | Optional description of the incident (may be null) |
| WorkspaceId | string | Yes | Unique identifier of the Log Analytics workspace |
| CreatedTime | string | Yes | ISO 8601 timestamp of when the incident was created |
| LastModifiedTime | string | Yes | ISO 8601 timestamp of the last modification |
***
### Severity / Status Mapping
Sentinel's `Severity` field maps directly to platform priority:
| **Sentinel Severity** | **Platform Priority** | **Description** |
| --------------------- | --------------------- | ----------------------------------------------------- |
| High | CRITICAL | High severity incident, immediate response required |
| Medium | HIGH | Medium severity incident, prompt investigation needed |
| Low | MEDIUM | Low severity incident, investigate when possible |
| Informational | LOW | Informational event, no immediate action required |
Sentinel `Status` maps to platform alert lifecycle:
| **Sentinel Status** | **Platform Status** | **Description** |
| ------------------- | ------------------- | ------------------------------------------ |
| New | PROBLEM | New incident created, not yet investigated |
| Active | PROBLEM | Incident is currently being investigated |
| Closed | RECOVERY | Incident has been resolved and closed |
***
### Alert Payload Examples
#### Raised (New Incident)
This payload is sent when a new Sentinel incident is created and the automation rule triggers the Logic App. The `Status` field is `"New"` and `Severity` reflects the analytics rule configuration.
JSON
```
{
"IncidentName": "OnCall Webhook Test Alarmı",
"IncidentNumber": 108,
"Severity": "Medium",
"Status": "New",
"Description": null,
"WorkspaceId": "32382f81-6cf6-416f-9bfb-5c6a224c5843",
"CreatedTime": "2026-02-24T01:11:49.84Z",
"LastModifiedTime": "2026-02-24T01:11:50.03Z"
}
```
### Installation & Configuration
#### Step 1: Create an Alert Source in the Platform
1. Log in to the alert management platform.
2. Navigate to Integrations → Add Integration.
3. Select Microsoft Sentinel (or Custom Webhook) as the provider.
4. Name the integration (e.g., `Production Sentinel Alerts`).
5. Save and copy the generated Webhook URL.
***
#### Step 2: Create a Log Analytics Workspace & Add Sentinel
Microsoft Sentinel requires a Log Analytics workspace. If you already have one, skip to Step 3.
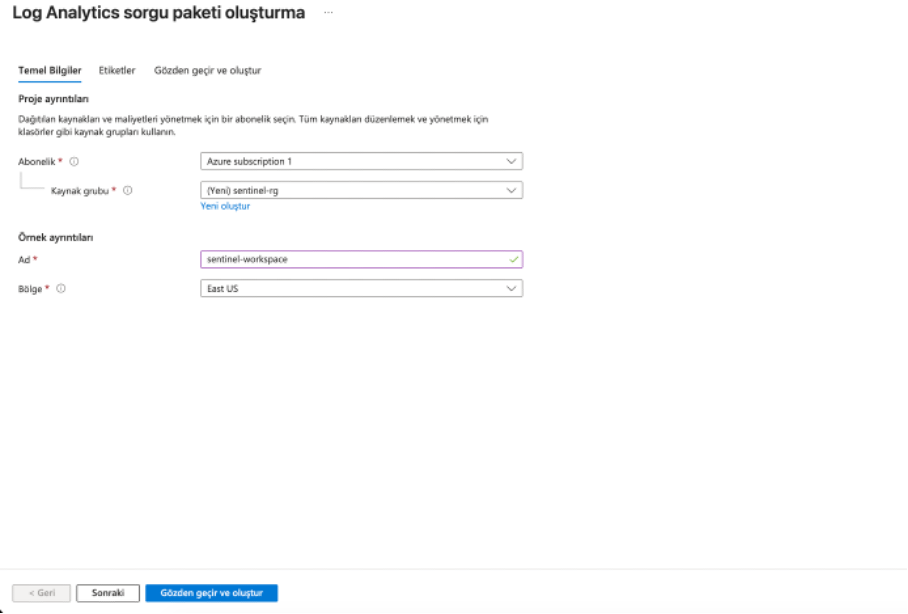
1. In the Azure Portal, search for Log Analytics workspaces and click + Create.
2. Create a new Resource Group (e.g., `sentinel-rg`) and name your workspace (e.g., `sentinel-workspace`). Complete the deployment.
3. Search for Microsoft Sentinel in the Azure Portal, click + Create, select your newly created workspace, and click Add.
> 
***
#### Step 3: Create a Logic App (Playbook)
*CRITICAL: To avoid trigger recognition bugs, always create the Playbook directly from within Sentinel, NOT from the general Azure Logic Apps menu.*
1. In the Azure Portal, go to Microsoft Sentinel and select your workspace.
2. In the left sidebar, under Configuration, click Automation.
3. Click + Create at the top and select Playbook with incident trigger.
4. Select your Resource Group (`sentinel-rg`) and name your playbook (e.g., `SentinelWebhookPlaybook`). Click Review + create and complete the deployment.
***
#### Step 4: Configure the Logic App Workflow
1. Open your newly created Logic App (`SentinelWebhookPlaybook`) and go to Logic app designer.
2. The trigger Microsoft Sentinel incident will already be there. Click the + button below it and select Add an action.
3. Search for HTTP and add the green HTTP action. Configure it exactly as follows:
* Method: `POST`
* URI: Your platform webhook URL (from Step 1)
* Headers: Key = `Content-Type`, Value = `application/json` *(⚠️ Ensure there are NO trailing spaces in the value)*.
* Body: Compose the JSON payload using the Dynamic content menu to map Sentinel incident fields:
JSON
```
{
"IncidentName": @{triggerBody()?['object']?['properties']?['title']},
"IncidentNumber": @{triggerBody()?['object']?['properties']?['incidentNumber']},
"Severity": @{triggerBody()?['object']?['properties']?['severity']},
"Status": @{triggerBody()?['object']?['properties']?['status']},
"Description": @{triggerBody()?['object']?['properties']?['description']},
"WorkspaceId": @{triggerBody()?['workspaceId']},
"CreatedTime": @{triggerBody()?['object']?['properties']?['createdTimeUtc']},
"LastModifiedTime": @{triggerBody()?['object']?['properties']?['lastModifiedTimeUtc']}
}
```
4. Click Save.
***
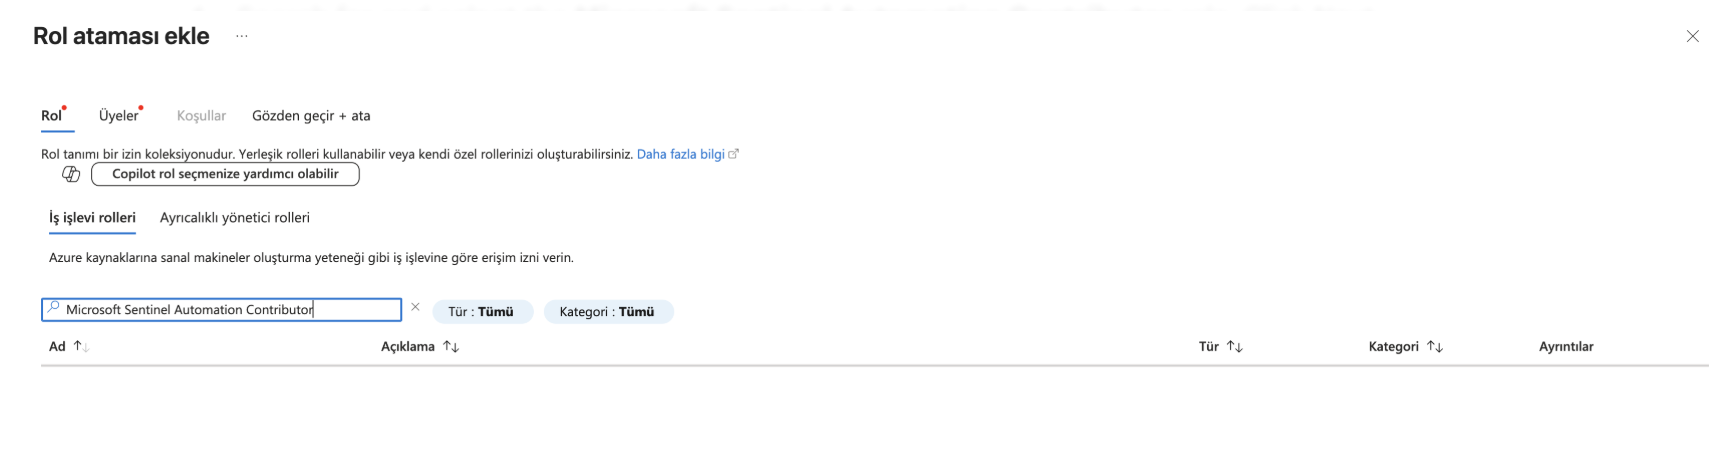
#### Step 5: Grant Permissions to Azure Security Insights (CRITICAL)
For Sentinel to automatically trigger your playbook, its background service (`Azure Security Insights`) must have explicit permission on the resource group.
1. In the Azure Portal search bar, type Resource groups and open `sentinel-rg`.
2. Click Access control (IAM) in the left menu.
3. Click + Add → Add role assignment.
4. Search for and select the Microsoft Sentinel Automation Contributor role. Click Next.
5. Under "Assign access to", select User, group, or service principal.
6. Click + Select members, search for Azure Security Insights, and select it.
7. Click Review + assign. *(Note: If you get a "Role assignment already exists" error, you can safely skip this step).*
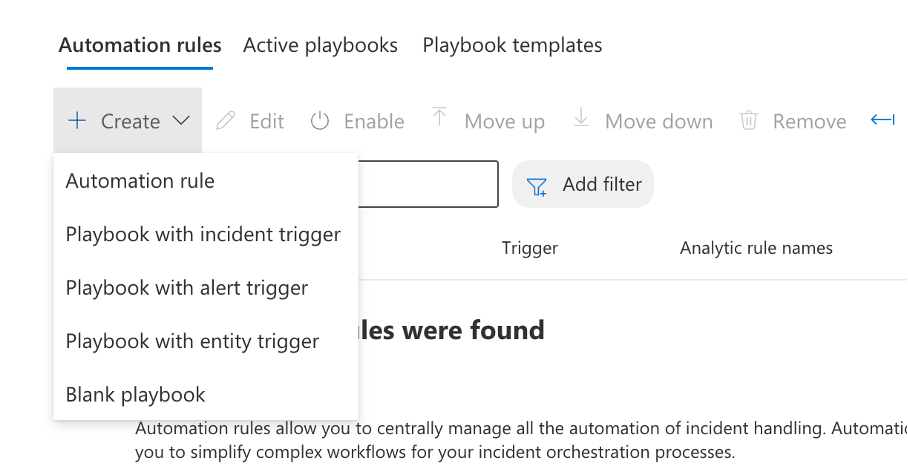
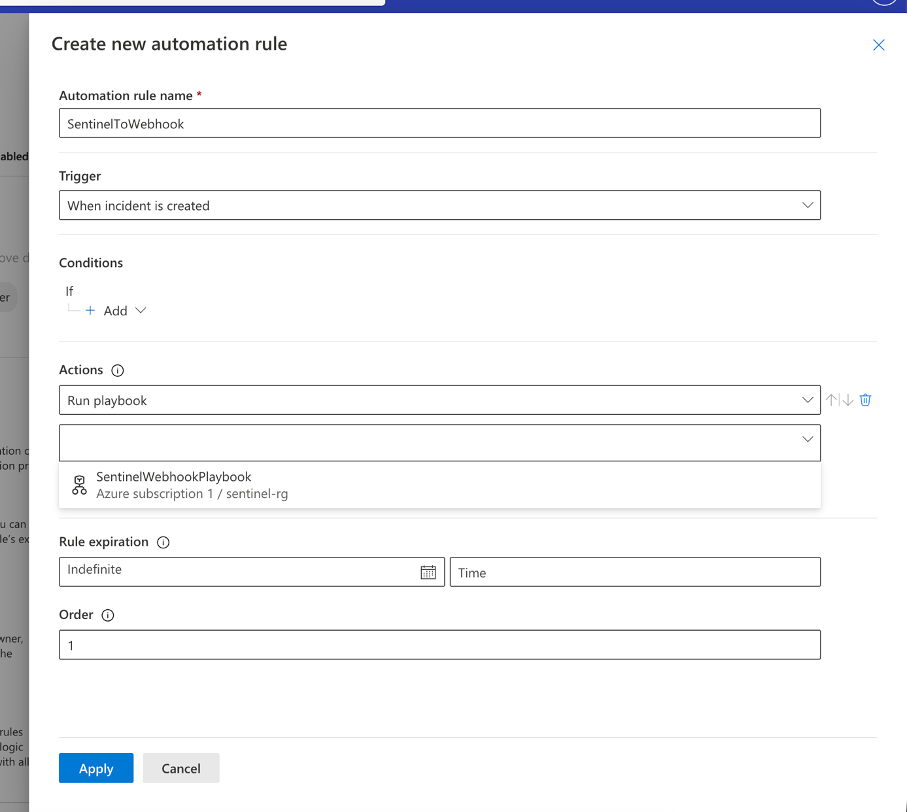
#### Step 6: Create a Sentinel Automation Rule
1. Return to the Microsoft Sentinel console → Automation.
2. Click + Create → Automation rule.
3. Configure the rule:
* Trigger: `When incident is created`
* Actions: `Run playbook`
* Open the playbook dropdown and select your Logic App (`SentinelWebhookPlaybook`).
4. Click Apply.
***
### Testing
To verify the integration end-to-end, create a scheduled analytics rule to generate a test incident.
1. In Sentinel, navigate to Analytics. Click + Create → Scheduled query rule.
2. Set Name to `OnCall Webhook Test Alarmı` and Severity to `Medium`.
3. In the Set rule logic tab, use the following KQL query:
Code snippet:
```
print Message="OnCall Test Alarmı"
| extend TimeGenerated = now()
```
4. Set query scheduling to run every 5 Minutes and ensure "Create incidents from alerts" is Enabled. Save the rule.
5. Wait up to 5 minutes. Check the Incidents page in Sentinel to confirm the incident was created.
6. Verify your webhook endpoint to ensure the JSON payload was received successfully. You can also check the Logic App's Run history for a `Succeeded` status.
### Troubleshooting
| **Issue** | **Possible Cause** | **Resolution** |
| ---------------------------------------------------- | ------------------------------------------------- | ------------------------------------------------------------------------------------------------------------------------------------------------------------------------------------------------------------ |
| Logic App run history shows `Failed` (Bad Request) | Format error in HTTP Headers. | Edit the Logic App HTTP action and ensure the `Content-Type` value is exactly `application/json` without any trailing spaces. |
| Playbook does not appear in Automation Rule dropdown | Incorrect Playbook creation or missing IAM roles. | Ensure you created the Playbook from within Sentinel, NOT the general Logic Apps menu. Verify that `Azure Security Insights` has the `Microsoft Sentinel Automation Contributor` role on the Resource Group. |
| Incidents are created but Playbook does not trigger | Automation rule misconfigured. | Verify the Automation Rule trigger is set to "When incident is created" (not Alert) and the rule is "Enabled". |
| Empty fields in the received alert | Dynamic content mismatch. | Open the Logic app designer and ensure the dynamic content tokens in your JSON body match the specific Sentinel incident schema fields. |